What is JWT
- JSON Web Token (JWT)
- popular way to authenticate users in a web application. It is a compact, URL-safe means of representing claims to be transferred between two parties. The claims in a JWT are encoded as a JSON object that is digitally signed using JSON Web Signature (JWS).
- Compact, url safe means of representing claims to securely transmit information between parties.
- These claims are encoded as JSON objects that are digitally signed using a JSON web signature
- Concise and efficient representation, allows for ease of transmissions over networks
- No need to reference external source/database to validate info
- Common use cases:
- Authentication
- information exchange
- Authorization
- Secure your APIs!
Popcorn hack: list 3 real world applications of JWT:
HACKS
- Banking Applications:
- JWTs secure sensitive financial transactions by verifying user identity and authorization for account access, payments, and transfers.
- Gaming Sites:
- JWTs manage user profiles, track game progress, and protect online multiplayer features, ensuring a fair and secure gaming experience.
- Shopping Applications:
- JWTs handle user authentication for personalized shopping experiences, secure payment gateways, and protect order history and shipping information.
Why do you need JWT
JSON Web Tokens (JWT) are crucial for secure and efficient user authentication in web development.
- They help manage user identity and sessions across different parts of a system.
- They play a key role in stateless authentication, allowing servers to verify user identity without storing session data.
- JWTs are especially useful in decentralized systems, enabling smooth communication between different services and ensuring secure user roles and permissions.
- JWTs simplify and enhance user authentication in modern web development.
Components of JWT
- What is a web token?
- A web token is a piece of information that represents a user’s identity or session and is used for authentication and authorization in web applications. It is typically a string of characters, often encoded in a JSON format, and is digitally signed to ensure its integrity.
- This is the structure of a JSON Web Token:
- Header
- The header typically consists of two parts: the type of the token, which is JWT, and the signing that is used, such as HMAC SHA256 or RSA SHA256. It is Base64Url encoded to form the first part of the JWT
- Payload
- Claims and user data
- claims are statements about the entity (users)
- There are three types of claims:
- registered: predefined claims that are no mandatory but recommended
- public: claims defined within the IA and JSON web token registry
- private: custom claims created to share information between parties that agree to using them
- Signature
- Ensuring integrity and authenticity
- verify the sender of the JWT
- function
- Creating a signature
- Verification process
- Signature tampering activity
Deep Dive into Anatomy of JWT
- Navigate to this website: Link
Encoded: Json Web Token (what you send to and from the client) Decoded: algorithm, data, verify token hasn’t been changed
eyJhbGciOiJIUzI1NiIsInR5cCI6IkpXVCJ9.eyJzdWIiOiIxMjM0NTY3ODkwIiwibmFtZSI6IkpvaG4gRG9lIiwiaWF0IjoxNTE2MjM5MDIyfQ.SflKxwRJSMeKKF2QT4fwpMeJf36POk6yJV_adQssw5c
// header
{
    "alg": "HS256", //type of sign in algorithm used for encoding and decoding
    "typ": "JWT"    //type of token
}
- Base 64 encoded
- useful to signature type to decode
// payload
{
"sub": "123", //example of a registered claim
"name": "jwt lesson",
"iat": 1516239022",
"authorities": [
    "ADMIN",
    "MANAGER"
],
"extra-claims": "some data here"
}
- where all different data for applciation is
- sub = subject : id of user you’re authenticating
- iat = issued at (when token was created)
- exp/eat = expired at (date when toke becomes invalid)
//signature
{
HMACSHA256(
    base64UrlEncode(header) + "." +
    base64UrlEncode(payload),
    your-256-bit-secret
) secret base64 encoded
}
- verify user does not change with token before it is sent back to you
- input your secret key
- uses algorithm in header to encode data (header + payload) using specific secret key
- if header/payload is changed, signature will not match
Header
import java.util.Base64;

public class JwtHeaderExample {
    public static void main(String[] args) {
        // JWT Header
        String algorithm = "HS256";
        String type = "JWT";

        // Combine Header properties
        String header = "{\"alg\":\"" + algorithm + "\",\"typ\":\"" + type + "\"}";

        // Base64 URL encode the header
        String base64UrlHeader = Base64.getUrlEncoder().encodeToString(header.getBytes());

        System.out.println("JWT Header: " + base64UrlHeader);
    }
}

// Run this code
JwtHeaderExample.main(null);
Payload
import java.util.Base64;
import java.util.HashMap;
import java.util.Map;

public class JwtPayloadExample {
    public static void main(String[] args) {
        // JWT Payload (Claims)
        Map<String, Object> claims = new HashMap<>();
        claims.put("name", "Grace");
        claims.put("class", "CSA");
        claims.put("exp", System.currentTimeMillis() + 1800000); // 30 minutes expiration

        // Convert Claims to JSON and Base64 URL encode the payload
        String payload = mapToJson(claims);
        String base64UrlPayload = Base64.getUrlEncoder().encodeToString(payload.getBytes());

        System.out.println("JWT Payload: " + base64UrlPayload);
    }

    private static String mapToJson(Map<String, Object> map) {
        // Implement JSON conversion logic (use your preferred approach)
        return "{ \"customKey\": \"customValue\" }";
    }
}

// Run This Code
JwtPayloadExample.main(null);
Signature
import javax.crypto.Mac;
import javax.crypto.spec.SecretKeySpec;
import java.nio.charset.StandardCharsets;
import java.security.InvalidKeyException;
import java.security.NoSuchAlgorithmException;
import java.util.Base64;

public class JwtSignatureExample {
    public static void main(String[] args) {
        // Secret key for encoding and decoding
        String secretKey = "your secret key";

        // Combine Header and Payload with a period '.'
        String base64UrlHeader = "base64UrlHeader"; // Placeholder for the actual base64UrlHeader
        String base64UrlPayload = "base64UrlPayload"; // Placeholder for the actual base64UrlPayload
        String headerPayload = base64UrlHeader + "." + base64UrlPayload;

        // Generate HMAC SHA-256 signature
        byte[] signature = HmacSha256(headerPayload, secretKey);

        // Base64 URL encode the signature
        String base64UrlSignature = Base64.getUrlEncoder().encodeToString(signature);

        System.out.println("JWT Signature: " + base64UrlSignature);
    }

    private static byte[] HmacSha256(String data, String key) {
        try {
            Mac sha256Hmac = Mac.getInstance("HmacSHA256");
            SecretKeySpec secretKey = new SecretKeySpec(key.getBytes(StandardCharsets.UTF_8), "HmacSHA256");
            sha256Hmac.init(secretKey);
            return sha256Hmac.doFinal(data.getBytes(StandardCharsets.UTF_8));
        } catch (NoSuchAlgorithmException | InvalidKeyException e) {
            throw new RuntimeException("Error while generating HMAC SHA-256", e);
        }
    }
}

// Run
JwtSignatureExample.main(null);
Putting It Together
Popcorn hack: write some comments that identify each part of the JWT
HACKS: Additional Notes on each
- Header: Contains metadata about the type of token and the signing algorithm
- Payload: Contains the claims or information about the user
- Signature: Created by signing the concatenated header and payload using a secret key
- Algorithm: Specifies the algorithm used for signing (e.g., HMAC SHA-256)
- Secret Key: The secret key used to sign the JWT and verify its authenticity
etc
import java.nio.charset.StandardCharsets;
import java.util.Base64;
import javax.crypto.Mac;
import javax.crypto.spec.SecretKeySpec;

public class JwtGenerator {

    public static void main(String[] args) {
        // Secret key to sign the JWT
        String secretKey = "yourSecretKey";

        // Subject of the JWT (e.g., user ID)
        String subject = "userId123";

        // Expiration time in milliseconds (current time + 1 hour)
        long expirationTimeMillis = System.currentTimeMillis() + 3600000;

        // Build and print the JWT
        String jwt = buildJwt(secretKey, subject, expirationTimeMillis);
        System.out.println("Generated JWT: " + jwt);
    }

    // Build JWT by combining header, payload, and signature
    private static String buildJwt(String secretKey, String subject, long expirationTimeMillis) {
        // JWT header in JSON
        String header = "{\"alg\":\"HS256\",\"typ\":\"JWT\"}";

        // JWT payload in JSON, including subject and expiration time
        String payload = "{\"sub\":\"" + subject + "\",\"iat\":" + System.currentTimeMillis() / 1000 +
                ",\"exp\":" + expirationTimeMillis / 1000 + "}";

        // Encode header and payload using Base64 URL encoding
        String encodedHeader = base64UrlEncode(header);
        String encodedPayload = base64UrlEncode(payload);

        // Combine encoded header and payload with a dot
        String dataToSign = encodedHeader + "." + encodedPayload;

        // Sign the data using the secret key and encode the signature
        String signature = signData(dataToSign, secretKey);

        // Combine dataToSign and signature with a dot to form the final JWT
        return dataToSign + "." + signature;
    }

    // Base64 URL encode the input string
    private static String base64UrlEncode(String input) {
        return Base64.getUrlEncoder().encodeToString(input.getBytes(StandardCharsets.UTF_8));
    }

    // Sign the input data using HmacSHA256 with the provided secret key
    private static String signData(String data, String secretKey) {
        try {
            // Initialize HmacSHA256 with a secret key
            Mac sha256Hmac = Mac.getInstance("HmacSHA256");
            SecretKeySpec secretKeySpec = new SecretKeySpec(secretKey.getBytes(StandardCharsets.UTF_8), "HmacSHA256");
            sha256Hmac.init(secretKeySpec);

            // Compute the signature and encode it using Base64 URL encoding
            byte[] signature = sha256Hmac.doFinal(data.getBytes(StandardCharsets.UTF_8));
            return base64UrlEncode(new String(signature, StandardCharsets.UTF_8));
        } catch (Exception e) {
            // Handle exceptions by wrapping in a Runtime Exception
            throw new RuntimeException("Error signing JWT", e);
        }
    }
}

// Invoke the main method to generate and print the JWT
JwtGenerator.main(null);
Generated JWT: eyJhbGciOiJIUzI1NiIsInR5cCI6IkpXVCJ9.eyJzdWIiOiJ1c2VySWQxMjMiLCJpYXQiOjE3MDMwMDE3OTIsImV4cCI6MTcwMzAwNTM5Mn0=.24Tvv71877-9AQjvv71I77-977-977-977-9WO-_ve-_ve-_ve-_vQXvv73vv71bGe-_ve-_ve-_vSHbue-_vQ==
JWT with Spring Boot
Big Idea

- JwtAuthFilter is executed first (validates and checks JWT Tokens)
- Internal check to check if the token is there or not.
- Extracts the subject (username or email)
- If token is missing → 403 error sent
- If token is there:
- Makes a call using the UserDetails Service to fetch user info from the database. Uses the subject extracted to do so
- Response comes back from the database (user either exists or doesn’t)
- If the user does not exist → 403 error sent
- If user exists → validate JWT process is started
- Validate JWT Process
- Calls the jwt service which takes the user and jwt token as parameters
- Token isn’t valid → 403 error sent
- Token is valid → update the security context holder and set the connected user. User is now authenticated yay!
- Automatically dispatch request → sent to dispatcher servlet → sent to controller → allow all execution user wants to do
- Sends http 200
Here is a diagram that makes it easier to understand the process tha happens between JWT and the API calls.

- User posts with their login information
- server does authentication to confirm the user
- store the user in the memory of the server, send a corresponding ID with a cookie back to the client
- Now every time the user sends a request, the cookie with that corresponding ID gets send to the server which verifies the ID and sends back a response.
Popcorn Hack: Create your own diagram to help visualize the JWT process
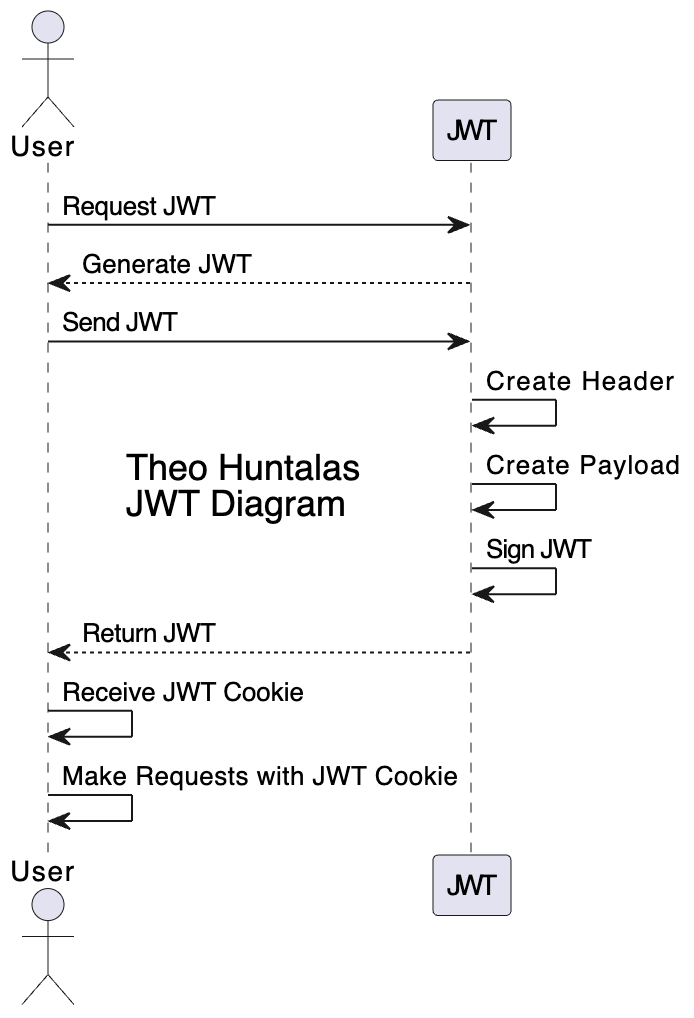
HACKS - Diagram Explanation
- User Requests JWT:
- The user starts the process by asking for a JWT (for spring portfolio it would be sending credentials to /authenticate).
- JWT Generates Itself:
- The JWT gets created, involving three steps:
- Creating the Header: this part specifies information like the type of token and encryption used.
- Creating the Payload: The content of the jwt, containing essential data about the user (like their ID and access permissions).
- Signing the JWT: This is like sealing the security of the jwt
- JWT Sends Itself to User:
- The jwt, now complete, is sent back to the user.
- User Receives JWT Cookie:
- The user stores the JWT as a cookie, now each subsequent request from the user includes the JWT in the header (can be seen in postman and picture)
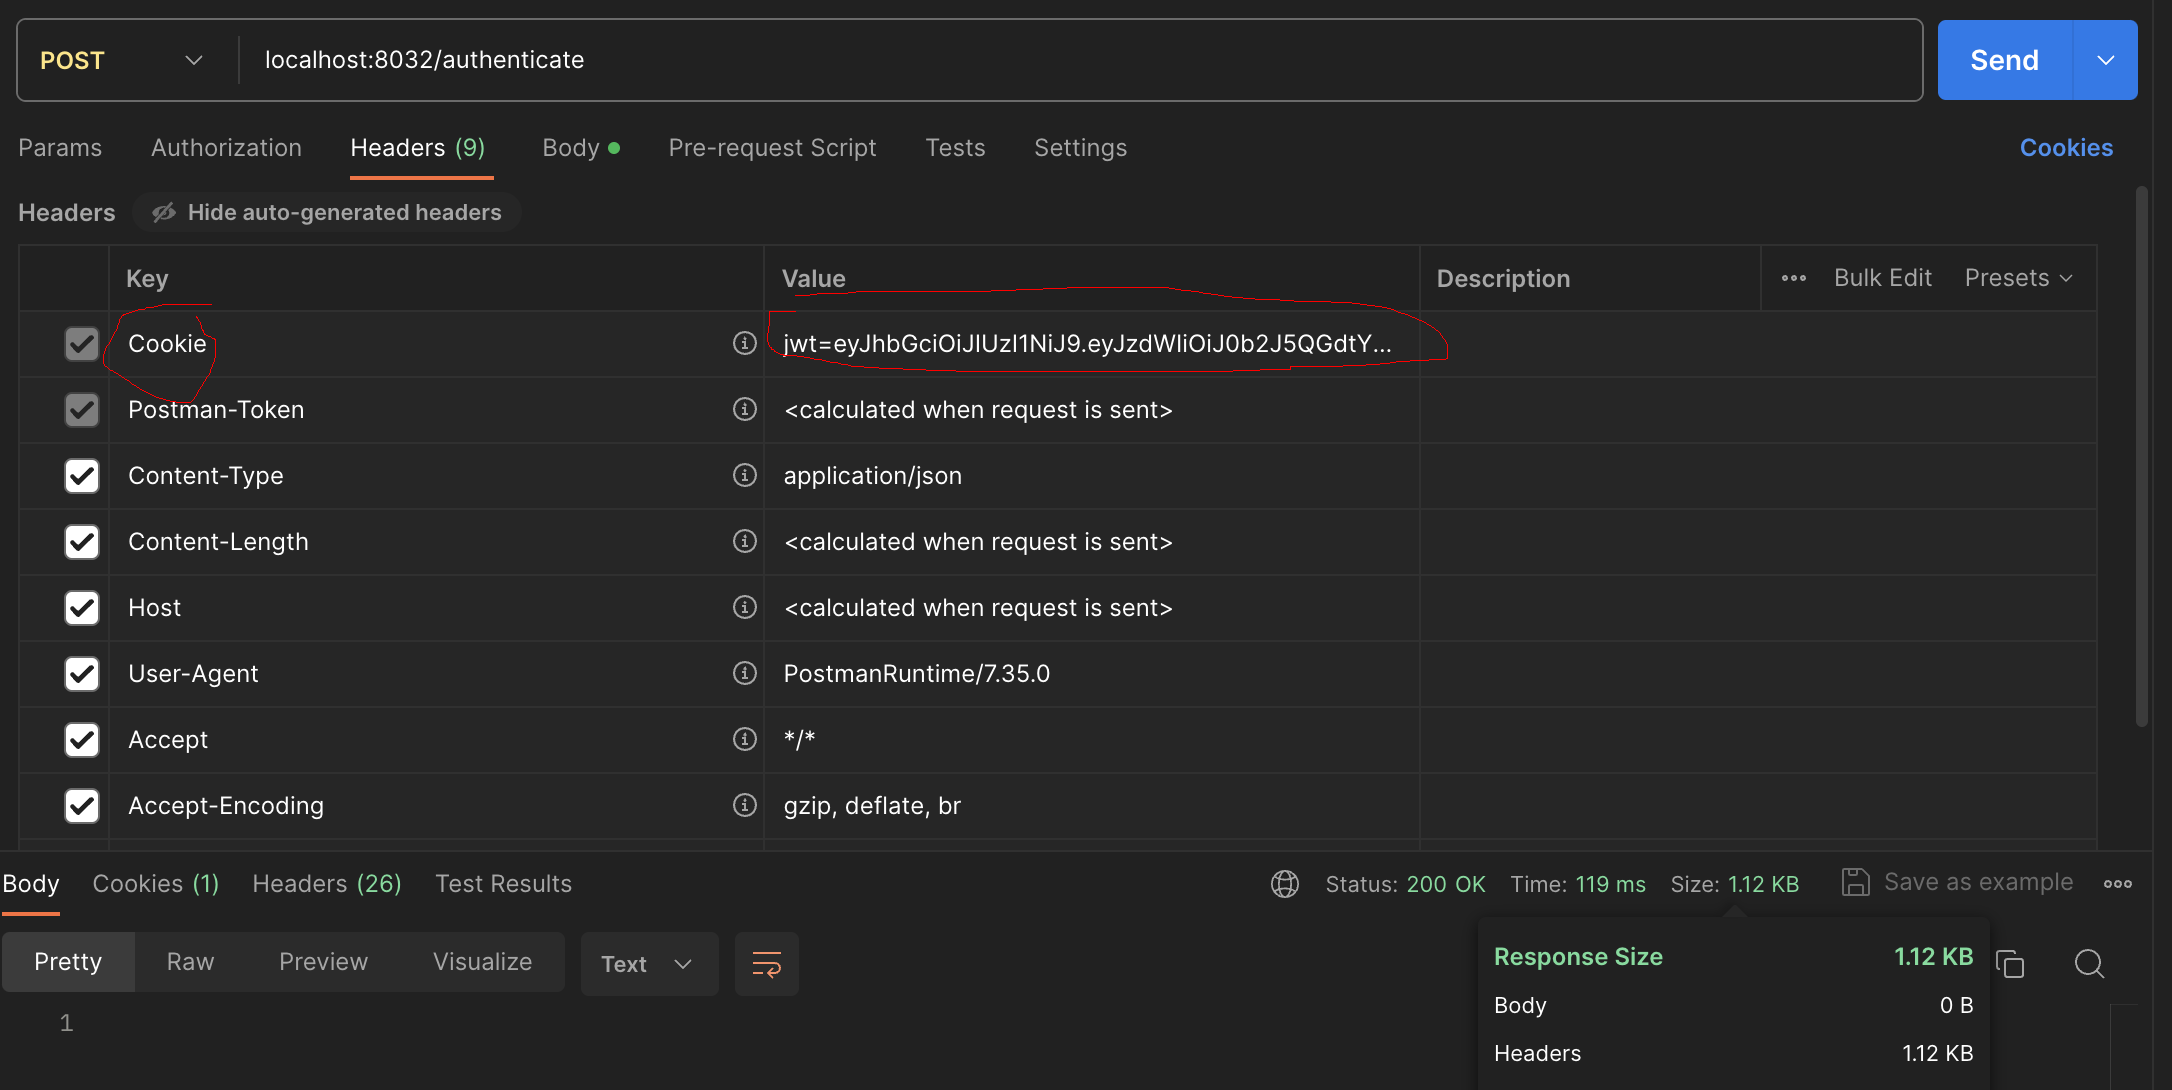
- The user stores the JWT as a cookie, now each subsequent request from the user includes the JWT in the header (can be seen in postman and picture)
- User Makes Requests with JWT Cookie:
- For whatever data the user now requests, the jwt cookie is their authorization
- JWT Validates Cookie:
- The JWT checks the validity of the cookie to ensure it’s authentic and hasn’t been tampered with.
- Access Granted:
- If the JWT cookie is authenticated, the user is granted access to the requested resource
JWT Walkthrough
- Clone this repo and follow along in each JWT file: https://github.com/vivianknee/jwtlessonBackend.git
Logic flow
Step 1 (Client - Login Request): The client sends a login request with user credentials (username and password) to the /authenticate endpoint.
Step 2 (JwtApiController):
- The JwtApiController receives the login request.
- It authenticates the user credentials using the AuthenticationManager.
- If authentication is successful: Retrieves user details using the PersonDetailsService. Generates a JWT using the JwtTokenUtil. Sends the JWT as an HTTP-only secure cookie in the response.
Step 3 (Client - Subsequent Requests):
- The client includes the JWT cookie in the headers of subsequent requests.
Step 4 (JwtRequestFilter):
- For each incoming request, the JwtRequestFilter intercepts the request.
- Extracts the JWT from the HTTP request headers or cookies.
- Validates the JWT using the JwtTokenUtil.
- If the token is valid, sets up authentication using Spring Security’s SecurityContextHolder.
Step 5 (Spring Security):
- Spring Security processes the request with the authenticated user.
- The application can now authorize the user based on the roles and permissions associated with the JWT.
Step 6 (Error Handling - JwtAuthenticationEntryPoint):
- If the JWT is missing, invalid, or expired, and the request requires authentication, the JwtAuthenticationEntryPoint handles the authentication failure.
- Responds with an HTTP 401 (Unauthorized) status.
Storing JWT
There are a few different options for storing a JWT in a JavaScript application:
-
Cookies: You can store the JWT in a cookie and send it back to the server with each request. This is a simple and widely-supported option, but it has some limitations. For example, you can’t access cookies from JavaScript on a different domain, and some users may have cookies disabled in their browser settings.
-
Local storage: You can store the JWT in the browser’s local storage (localStorage) or session storage (sessionStorage). This option allows you to access the JWT from JavaScript on the same domain, but it is vulnerable to cross-site scripting (XSS) attacks, where an attacker can inject malicious code into your application and steal the JWT from the storage.
-
HttpOnly cookie: You can store the JWT in an HttpOnly cookie, which is a cookie that can only be accessed by the server and not by client-side JavaScript. This option provides some protection against XSS attacks, but it is still vulnerable to other types of attacks, such as cross-site request forgery (CSRF).
Postman
- Trying to access /api/person/ without jwt token stored in Cookies
- Trying to access /api/person/ with a wrong jwt token stored in Cookies
- Trying to access /api/person/ with a jwt token that does not have the signature
- Accessing /api/person/ with generated jwt token stored in Cookies header


Implementation Approaches and Security Considerations
JWTs are signed to ensure they cannot be modified in transit. Signature is a crucial aspect of JWT security.
Key Usage
- Token Issuance: When the token is issued by the authorization server, it is signed with a key.
- Token Reception: When the client receives the token, the signature is validated using the key.
import io.jsonwebtoken.Jwts;
import io.jsonwebtoken.Claims;

public class TokenReceptionExample {

    // Simulate receiving a token from the client
    private static String receiveTokenFromClient() {
        // In a real scenario, this would be received from the client (e.g., from a request header)
        return "eyJhbGciOiJIUzI1NiIsInR5cCI6IkpXVCJ9.eyJzdWIiOiAiMTIzIiwgImV4cCI6IDE2MjM5NzYzODF9.4X1lC5fU4dV1n9l02LZyGQSy5K-O5fnZM0t6eO-w2Qs";
    }

    public static void main(String[] args) {
        // Example of Token Reception
        String receivedToken = receiveTokenFromClient();
        System.out.println("Received Token: " + receivedToken);
    }
}
Symmetric vs. Asymmetric Key Approaches
- Symmetric Key: A single secret key is used both to sign and validate the token.
- Asymmetric Key: Different keys are used to sign and validate the token, only the authorization server has the ability to sign it.
import io.jsonwebtoken.Claims;
import io.jsonwebtoken.ExpiredJwtException;
import io.jsonwebtoken.Jws;
import io.jsonwebtoken.Jwts;
import io.jsonwebtoken.MalformedJwtException;
import io.jsonwebtoken.security.Keys;

import java.security.Key;

public class SymmetricKeyValidationExample {

    // Symmetric Key for Token Signing and Validation
    private static Key symmetricKey = Keys.secretKeyFor(io.jsonwebtoken.SignatureAlgorithm.HS256);

    // Token Validation with Symmetric Key
    private static Claims validateTokenSymmetric(String token) {
        try {
            // Parse and verify the token using the symmetric key and the HS256 algorithm
            Jws<Claims> claimsJws = Jwts.parserBuilder().setSigningKey(symmetricKey).build().parseClaimsJws(token);
            return claimsJws.getBody();
        } catch (ExpiredJwtException e) {
            // Handle case where the token has expired
            System.out.println("Token has expired");
        } catch (MalformedJwtException e) {
            // Handle case where the token is invalid (e.g., tampered with)
            System.out.println("Invalid token");
        }
        return null;
    }

    public static void main(String[] args) {
        // Example of Token Validation with Symmetric Key
        String receivedToken = receiveTokenFromClient();
        Claims validatedClaims = validateTokenSymmetric(receivedToken);
        if (validatedClaims != null) {
            System.out.println("Validated Payload: " + validatedClaims);
        }
    }
}
Additional Security Considerations
- Token Scope: limit token access to specific resources or actions
- Token Revocation: implement mechanism to revoke token if user’s access needs to be taken away
- Token Encryption: encrypt token if it contains sensitive information that shouldn’t be visible (even if intercepted)
- Regular Key Rotation: rotate keys regularly for security and to limit the impact of compromised key
Hacks
- Implementation
- Implement a simple authentication system using JWT with Java. Show how JWT works with postman. Get the request to be authorized
HACKS
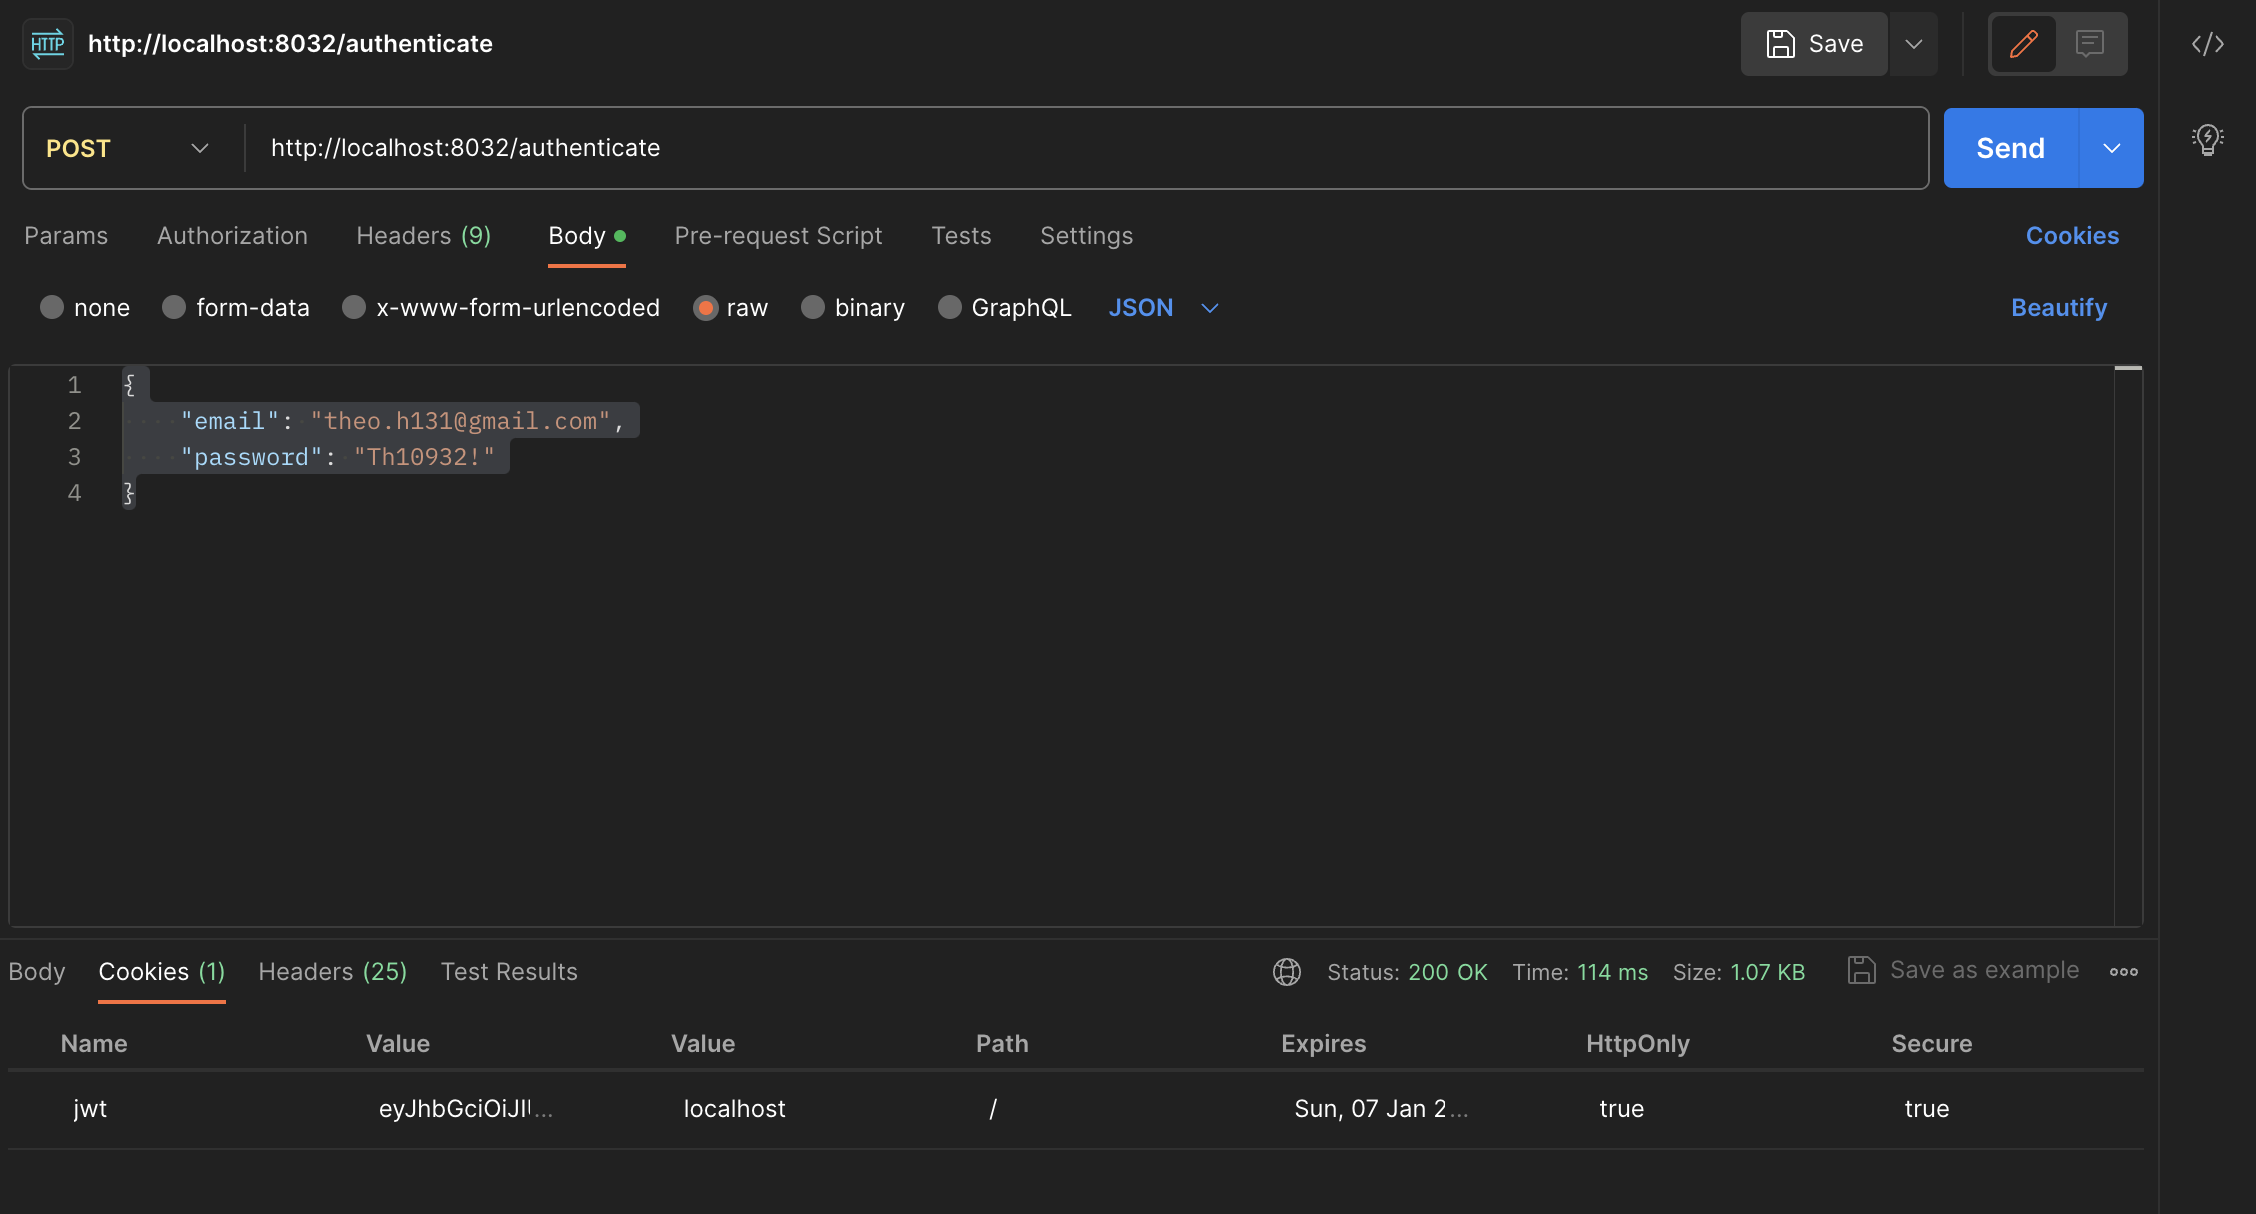
- Implement a simple authentication system using JWT with Java. Show how JWT works with postman. Get the request to be authorized
- The 200 code is shown therefore proving the request returned OK
- JWT cookie is now stored in the header for future requests
EXTRA: I changed the user data to include myself. So just changing the data, and authenticating myself with it as well (look up at image for proof)
- MC Knowledge test (5)
- Which part of the JWT contains the actual data (claims)?
- Payload
- What is the purpose of the header in a JWT?
- It identifies the algorithm used to generate the signature.
- How are the parts of a JWT (header, payload, and signature) separated?
- Period
- Which algorithm is commonly used for JWT signatures?
- HMAC (Hash-based Message Authentication Code)
- How are JWTs commonly transmitted?
- Any of the above, depending on the application
- Which part of the JWT contains the actual data (claims)?